Date: 10/4/2011
Summary:
The purpose of the lab is to extract RNA and protein from a tissue. The protein acquired will then be quantified using the Bradford Assay method.
Materials and Method:
RNA Extraction:
Materials:
- micropipettes (1-1000uL)
- sterile filter pipette tips (1-1000uL)
- sterile (RNase free) 1.5 mL microcentrifuge tubes
- sterile disposable pestles
- vortex
- ice buckets
- gloves
- lab pen
- safety glasses
- Tri-Reagent
- Obtain a sterile 1.5 mL microcentrifuge tube and label it with our group's member name initial and date of lab. (DBB, 10/4/2011)
- Fill the tube with 500uL of the Tri-Reagent.
- Obtain a sample (gill) from the sample's ice bucket.
- Insert the sample to the tube with the Tri-Reagent solution and homogenize it using the sterile disposable pestles. (When the tissue was stuck on the bottom and difficult to homogenize, close the tube and use the vortex so it will not be stuck)
- When the sample was fully homogenized, add 500uL more of Tri-Reagent to the tube.
- Vortex the tube vigorously for 15s.
- Give the homogenized tissue sample to the TA for storage at -80C for next lab.
Protein Extraction and Quantification:
Materials:
- micropipettes (1-1000uL)
- sterile filter pipette tips (1-1000uL)
- sterile (RNase free) 1.5mL microcentrifuge tubes
- sterile 2mL screw cap microcentrifuge tubes
- sterile disposable pestles
- spectrophotometer
- cuvettes for spectrophotometer
- refrigerated microcentrifuge
- ice buckets
- gloves
- kim wipes
- lab pen
- safety glasses
- CellLytic MT Cell Lysis Reagent with Protease Inhibitor Cocktail
- Coomassie Protein Assay Reagent
- DI water
Method for Protein Extraction:
- Obtain a 1.5mL snap cap and lable it with our group member's initial and the date of lab.
- Add 500uL of CellLytic MT solution into it.
- Obtain a tissue sample (Mantle) from the ice bucket and record the weight of the tissue denoted on the tube. (Weight = 0.0229 g)
- Put the tissue sample to the snap cap and homogenize the tissue with a sterile disposable pestle.
- Close the tube and invert the tube several time
- Spin the tube in the refrigerated microcentrifuge for 10 minutes at max speed.
- Take a fresh tube and label it with the word "Protein", put the initial and date of lab.
- After the tube has been spun for 10 minutes, transfer the supernatant to the "Protein" labeled tube and store on ice.
Method for Protein Quantification:
- Obtain and label a 2mL snap cap tube with the word "Protein", BA (Bradford Assay), an initial, and the date.
- Dilute an aliquot of protein sample by transfering 15uL of the protein sample and 15uL of DI water to the 2mL snap cap using a pipette.
- Obtain a second 2mL tube and pipette 30uL of DI water.
- Add 1.5mL of Bradford Reagent to both tubes.
- Close and invert the tube several times, then incubate the tube in room temperature for 10 minutes.
- Mix the "blank" via pippeting and put 1000uL to a plastic, disposable cuvette.
- Wipe the "blank" cuvette with a KimWipe and put the it into the spectrophotometer and zero it.
- Mix the sample via pippeting and put 1000uL to a plastic, disposable cuvette.
- Wipe the sample cuvette with a KimWipe, put it to the spectrophotometer, set the absorbance at 595nm and record the value.
- Remove the cuvette, and repeat step 8 and 9 and record the value for the second time.
- Average the two absorbance values recorded
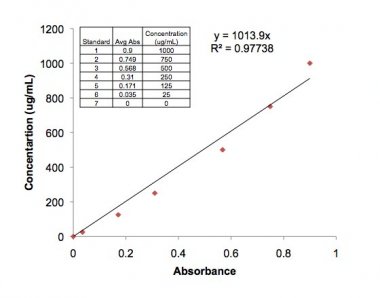
- Back-calculate the protein concentration using the equation y=1013.9x (x is the absorbance obtained, y is the concentration)
- Multiply the concentration by 2 (from the dillution on step 2)
- Give protein sample to the TA for storage at -20C
Result:
The result of the Protein Quantification:
The absorbance values: 0.347 & 0.348
Average: 0.3475
Protein Concentration= 1013.9 * 0.3475 = 352.33
Because it was dilluted= 352.33 * 2 = 704.6605
Conclusion:
There are no expected result for this lab. This lab is only a training for future labs to be able to extract RNA and protein from a sample and quantify its protein concentration. This skill will surely be used for future experiments.
Reflection:
The purpose of this lab is for lab training. We learned how to extract a RNA and protein from a tissue sample. We also able to quantify the concentration of the protein. This method can be used to look for gene expression from the sample's RNA and protein in future experiments.
Lab 2
Date: 10/11/2011
Summary:
The purpose of this lab is to finalize the extraction of RNA from Lab 1 and to quantify the concentration of RNA.\
Materials and Method:
Materials:
- micropipettes (1-1000uL)
- sterile filter pipette tips (1-1000 uL)
- 1.5 mL microcentrifuge tubes
- microcentrifuge tube rack
- lab coats
- safety glasses
- gloves
- lab pen
- timers
- ice buckets
- phenol/ chloroform waste containers (liquid/solid)
- vortex
- hot water bath
- nanodrop spectrophotometer
- chloroform
- RNase free water
- isopropanol
- 75% ethanol
- 0.1% DEPC treated water
RNA Extraction Method:
- Turn the heating block to 55C. (Done by the TA)
- Incubate homogenized tissue sample (from Lab 1) for 5 minutes in room temperature.
- In the fume hood, add 200uL of chloroform to the sample, then close the tube.
- Vortex vigorously for 30 seconds. (the solution will look like a milk shake)
- Incubate for 5 minutes in room temperature.
- Spin tube in refrigerated microfuge for 15 minutes at max speed.
- Gently remove the tube from microfuge without disturbing the tube.
- Transfer most of the aqueous phase (top clear part) to a fresh microfuge tube and label the tube with your initial and date (DBB, 10/11/2011). (Do not tranfer the white, cell debris. The best way is to leave some of it behind.)
- Close the tube containing the aqueous phase and properly discard the other tube containing the organic and interphase.
- Add 500uL of isopropanol to the new tube and close it.
- Mix by inverting the tube until it appears uniform. (until it doesn't appear viscous and lumpy)
- Incubate for 10 minutes at room temperature.
- Spin in microfuge at max speed for 8 minutes. (Place the hinge of the tube outward, away from the center of the microfuge)
- A small white pellet should be present after the microfuge. Remove most of the supernatant (liquid) without removing the pellet.
- Add 1mL of 75% EtOH (ethanol) to pellet.
- Close the tube and vortex vigorously to dislodge the pellet.
- Spin in microfuge at 7500g for 5 minutes.
- Remove the supernatant without removing the pellet.
- Briefly spin the tube in the microfuge (~15 seconds) to pool residual EtOH.
- Remove the remaining EtOH if there are still some.
- Leave the tube open and let the pellet dry at room temperature no more than 5 minutes.
- Add 100uL of 0.1% DEPC-H2O and mix the pellet with it by pipetting up and down until it is dissolved.
- Incubate tube at 55C for ~5 minutes to make the RNA more soluble.
- Remove the tube and put it on ice. (This will be the stock RNA)
RNA Quantification Method:
NOTE: RNA sample must always be kept on ice
- Pipette 2uL of 0.1% DEPC-H2O to the Nanodrop and lower the arm.
- Click Blank. This will be the zero value of the reading. (only need to do once for all of the RNA reading)
- Raise the arm and wipe the Nanodrop pedestal with a KimWipe
- Pipette 2uL of the RNA sample to the Nanodrop pedestal and lower the arm.
- Click "Measure". Record the A260/230, A260/280, and the RNA concentration.
- Raise the arm of the pedestal and wipe it with KimWipe.
- Label the tube with "RNA", source organism, your initials(DBB), date(10/11/2011), and concentration.
- Give the sample to the TA for storage at -80C.
Result:
RNA Quantification:
Concentration: 281.2 ng/uL
260/280 = 1.83
260/230 = 1.64
The RNA is pure/clean
Conclusion:
There is no expected result for this lab. This lab is for practicing RNA extraction and quantification. The goal is to successfully extract a pure RNA sample from a tissue and calculate the concentration and the purity of a sample. This skill will surely be used for future experiments.
Reflection:
The purpose of this lab is for lab training. We learned how to extract RNA from a tissue sample and quantify its concentration and purity. This method can be used for future lab experiments when looking for gene expressions through the RNA.
Lab 3
Date: 10/18/2011
Summary:
The purpose of the lab is to do reverse transcription. Making RNA to become cDNA.
Materials and Method:
Materials:
- Micropipettes (1-1000uL)
- Sterile filter pipette tips (1-1000uL)
- Tip waste jar
- PCR tubes (0.5 ml; thin walled)
- RNA samples (from lab 2)
- M-MLV reverse transcriptase
- M-MLV 5x reaction buffer
- Oligo dT
- dNTPs
- Nuclease Free water
- thermal cycler
- microfuge tube racks
- PCR tube racks
- ice buckets
- Kimwipes
- Lab coat
- Safety glasses
- Gloves
Method:
- Mix the stock RNA by inverting tube several times.
- In a 0.5 ml PCR tube, label it with your initial (DBB), and "cDNA.
- Combine in the PCR tube:
2. 1 uL of oligo dT
3. 4 uL of nuclease free H2O
4. Incubate the mixture for 5 minutes in a 70C thermocycler.
5. Transfer it to ice immediately, then centrifuge the tube briefly.
6. Add:
1. 5 uL of M-MLV 5x Reaction Buffer
2. 5 uL of dNTPs
3. 1 uL of M-MLV RT
4. 4 uL of nuclease free H2O
7. Incubate the mixture for 60 minutes at 42C, then heat inactivate it at 70C for 3 minutes in the thermocycler.
8. Spin down the sample in a centrifuge briefly.
9. Store on ice or at -20C
Result:
There are no results for this lab.
Conclusion:
There are no results for this lab.
Reflection:
This lab is for practicing reverse transcription. By doing this, we could analyze the DNA of the sample. It would be better if I get the result the same day we did the lab, so I could understand better.
Lab 4
Date: 10/25/2011
Summary:
The purpose of this lab is to rehydrate primers so it is ready for PCR. The second objective is to extract tissue sample from the experimental animals for further analysis.
Materials and Method:
Materials:
- micropipettes (1-1000uL)
- sterile filter tips (1-1000uL)
- tip waste jar
- 1.5mL microcentrifuge tubes
- microcentrifuge tube rack
- lab coats
- safety glasses
- gloves
- lab pen
- hot water bath
- PCR tube (0.5mL; thin walled)
- cDNA (student provided)
- dNTPs
- 2x GoTaq Green master mix
- Primers
- Nuclease Free water
- TE Buffer
- thermal cycler
- ice bucket
Method:
Primer Rehydration:
- Spin down primer for 2-3 minutes
- Add 325uL TE buffer to the forward primer.
- Incubate stocks for ~2 minutes in the hot bath.
- Vortex the primer.
- Prepare 10uM working stock for PCR by mixing 90uL of nuclease free water and 10uL 10uM primer.
Master Mix:
- Obtain a 1.5mL microcentrifuge tubes, label with "MM", and prepare master mix by mixing: (Note: multiply quantity by 5 for 4 divided sample + 1 in case of error)
- 2x GoTaq - 25uL
- 10uM forward primer - 1 uL
- 10uM reverse primer - 1 uL
- Nuclease free H2O - 21 uL
- Obtain 4 0.5mL PCR tube, label it with initial (DBB), sample name, and number
- Pipette 48uL to each of the PCR tube.
- Pipette 2uL of cDNA to each of the PCR tube sample.
- Spin the samples, and put it into the thermo cycler to go through:
| Step |
Temperature |
Time |
Cycles |
| Denaturation |
95C |
5 min |
1 |
| Denaturation |
95C |
30 sec |
40 |
| Annealing |
55C |
30 sec |
|
| Extension |
72C |
90 sec |
|
| Final extension |
72C |
3 min |
1 |
| Hold |
4C |
∞ |
1 |
Oyster Tissue Extraction:
- Prepare 1.5mL microcentrifuge tubes and label them with group name(Hypoxia), tissue sample, number.
- Bring the Oyster samples to the lab.
- Open the oysters one by one using the oyster opener (Leave the other oysters submerged in water. Do not take it out if you don't want to extract tissue)
- Extract using scissors and tweezers, with sterilization (Dip in EtOH) for each different tissue.
- Extract mantle and gill sample from the oyster, put each in a 1.5mL microcentrifuge tube with labels on it. (Extract enough sample for 3 seperate experiment)
- Put tissue sample on dry ice immediately and store it in the -80C freezer when done.
Results:
Ready PCR and Oyster tissue samples for next lab.
Conclusions:
The cDNA is amplified and ready to use in the next lab. The Oyster's tissue sample are also ready to be used for next lab.
Reflection:
The purpose of this lab is to practice PCR and to extract tissue sample for the group research. This lab will be an useful practice for rehydrating primers, doing PCR to the research project and other future projects.
Lab 5
Date: 11/1/11
Summary: The purpose of this lab is to run amplified PCR product from previous lab in an agarose gel, extract protein sample from research experiment samples, and run it on a SDS-PAGE Gel.
Material and Method:
Making agarose gel: (Done by the TA)
Material:
- Micropipettes (1-1000 μl)
- Sterile filter pipette tips (1-1000 μl)
- Tip waste jar
- 1L flask
- agarose
- 1X TAE
- Ethidium bromide
- Microwave
- Gel rigs
- Kimwipes
- Lab coat
- Safety glasses
- gloves
Method:
- Weigh 2g of agarose and mix with 150mL 1x TAE in a 1L flask
- Microwave solution for ~ 3 minutes. Keep an eye on the solution so that it does not boil over. You want the solution to be clear - no precipitate and no bubbles.
- Cool solution (you should be able to touch the flask for a few seconds), then add 12uL ethidium bromide(EtBr).
- Mix thoroughly by swirling, then pour into gel tray.
- Add gel combs. Using a clean pipet tip, pop any bubbles that could get in the way of your PCR product.
- After gel is set, wrap in plastic wrap (label with your initials and date) and place gel in the fridge if not using immediately.
- Place gel in gel box and fill it with 1x TAE buffer (fully cover wells)
- Remove comb from well
- Load 5uL of ladder in the top and bottom far left lane and far right lane.
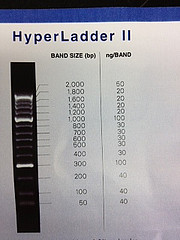
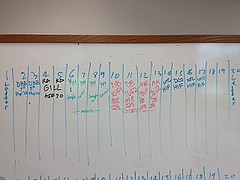
- Load 25uL of PCR sample into the gel and store the rest of it in -20C. (Then write in the board where you put your sample)
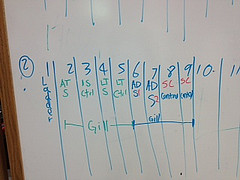
- Run gel at 100V for ~1 hour. (The sample will run from negative pole (black) to positive (red))
- See the gel on the UV transillumitor.
SDS - Polyacrylamide Gel Electrophoresis (SDS-PAGE)
Material:
- micropipettes (1-1000 μL)
- sterile filter pipette tips (1-1000 μL)
- sterile gel loading tips
- 1.5 mL screw cap tubes
- microcentrifuge tube rack
- lab coats
- safety glasses
- gloves
- lab pen
- timers
- heating block with water bath
- tube "floatie"
- glass container for boiling water that can accommodate "floatie"
- protein gel box (SR provided)
- SDS/PAGE gels
- gel loading tips
- trays for staining gels
- power supply
- platform rocker/shaker
- plastic wrap
- 2X SDS reducing sample buffer
- protein ladder marker
- gel running buffer
- light box
- digital camera (Phone camera)
Method:
- Extract protein from experiment sample. (See lab 1 for procedure) Label your protein sample with your Initial(RD), date(11/1/11), and which tissue sample (Gill, Control Oyster)
- Boil water (done before by TA)
- In a fresh screw cap tube, add 15uL of your protein sample and 15uL of 2X Reducing Sample Buffer. Store the remaining protein sample in -20C.
- Mix sample by flicking, and briefly centrifuge (~10s) to pool liquid in the bottom of tube.
- Boil sample for 5 minutes.
- When finished boiling, centrifuge for ~1minute.
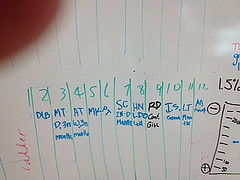
- Slowly take your sample and put it into a well in the gel. (Write in the board where you put your sample)
- Start the power supply and run the gel with 150V for ~45 minutes.
- Turn off power supply and disconnect it from the gel box.
- Remove gel box lid.
- Disengage the tension wedge.
- Remove gel from gel box.
- Carefully crack open cassette to expose gel.
- Trim wells at the top of the gel.
- Cut a corner of the gel to remember the gel orientation.
WesternBreeze Chromogenic Western Blot Immunodetection:
Material:
- Nanopure water
- gel staining tray
- Blocking Solution
- rotary shaker
- Primary Antibody Solution
- Antibody Wash
- Secondary Antibody Solution
- Chromogenic Substrate
- timers
- lab coats
- safety goggles
- gloves
- SDS-PAGE gel
- Tris-Glycine Transfer Buffer
- filter paper
- nitrocellulose membrane
- semi-dry transfer station
Method: (All was done by instructor)
1. Soak the filter paper, membrane, and gel in Tris-Glycine Transfer Buffer.
2. Assemble the sandwich: (from bottom to top)
- Anode (+++)
- Filter Paper
- Membrane
- Gel
6. Cathode (---)
3. Transfer the blot for 30 minutes at 20V
4. Remove the gel from the sandwich and rinse of adhering pieces of gel with transfer buffer.
5. Wash membrane twice, for 5 minutes each, with 20mL of pure water
6. Put the membrane in the plastic box and add 10mL of Blocking Solution. Then cover and incubate on a rotary shaker set at 1 revolution/second.
7. Decant Liquid (The TA will do this steps onward, come back to lab the next day to see result.)
8. Rinse the membrane with 20mL of water for 5 minutes, then decant. Repeat.
9. Incubate the membrane in 10 mL of Primary Antibody Solution. Decant the solution.
10. Rinse the membrane with 20 mL of Antibody Wash for 5 minutes, then decant. Repeat 3 times.
11. Incubate the membrane in 10 mL of Secondary Antibody Solution for 30 minutes. Decant.
12. Wash the membrane for 5 minutes with 20 mL of Antibody wash, then decant. Repeat 3 times.
13. Rinse the membrane with 20 mL of pure water for 2 minutes, then decant. Repeat twice.
14. Incubate the membrane in 5 mL of Chromogenic Substrate until a purple band appears. This will occur between 1-60 minutes after adding the Chromogenic Substrate.
15. Dry the membrane on a clean piece of filter paper to the open air.
Results:
PCR Gel:
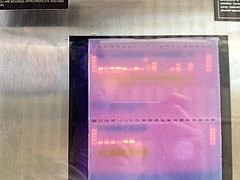 |
| Gel with PCR |
SDS-PAGE Gel:
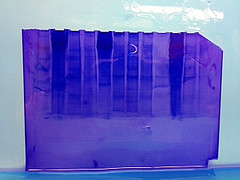 |
| Gel with protein after Western Blot |
Conclusion:
PCR Gel: The PCR Gel shows that the gene is expressed. It can be seen from the shining line where I put my PCR sample. The control is in the second row, the last two wells. It doesn't have any bright lines which means that the gene is not expressed.
SDS-PAGE: The result is not shown. Could be because the antibody for mouse is not compatible to oysters.
Reflection:
Now we know how to use the agarose gel to see if there's any gene expression. This will be useful for the research experiment project. The SDS-PAGE is still unsuccessful. Maybe after a new working antibody is acquired, the result will be better. This experiment uses a lot of steps and there are a lot of room for errors. This is a good practice to avoid mistakes in future experiments.
Lab 6 - part 1
Date: 11/8/2011
Summary: The purpose of this lab is to extract RNA from the experiment's tissue samples.
Materials and Methods:
15 experiment's tissue sample (Oysters)
Inserted into a 1.5mL centrifuge tube
5 Control (RD,mantle, C1,2,3,4,5)
5 High Oxygen (RD, mantle, O1,2,3,4,5)
5 Low Oxygen (RD, mantle, N1,2,3,4,5)
For the RNA Extraction Part-1: See lab 1 RNA Extraction
For the RNA Extraction Part-2: See lab 2 RNA Extraction
Result:
We have 15 samples that is ready for Reverse Transcription.
5 from Control, 5 from High Oxygen level treatment, 5 from Low Oxygen level treatment.
Conclusion:
The Reverse Transcription could be done soon to make cDNA.
Reflection:
For this lab, it takes a lot of time. Next time when doing similar lab, do it faster and more concise to save time.
Lab 6 - part 2
Date: 11/14/2011
Summary: Do reverse transcription to create cDNA and RNA quantification
Materials and methods:
Samples from lab 6 part 1
For RNA quantification: See lab 2 RNA Quantification Method.
For Reverse Transcription: See lab 3.
Result:
RNA Quantification:
| RNA Quantification Results |
Reverse Transcription:
cDNA obtained from all samples.
Conclusion:
The RNA samples show good concentrations, and the cDNA are ready for qPCR.
Reflection:
Almost forgot to do the RNA quantification. Next time remember that it is important.
Lab 7
Date: 11/15/2011
Summary: Learn to measure genome wide methylation using dot blot, and to do qPCR.
Materials and Method:
Methylated Cytosine Dot Blot:
Materials:
- DNA
- 1.5 mL microcentrifuge tubes
- lab pens
- lab coats
- kimwipes
- safety glasses
- gloves
- vacuum manifold
- nylon membrane
- 6X SSC
- filter paper
- hot plate
- large beaker
- floaties for 1.5 mL tubes
- ice buckets
- ice
- microcentrifuge
- micropipettes
- sterile tips for micropipettes
- denaturation buffer
- scissors
- plastic wrap
- UV transilluminator
- Ultra filtered water (Nanopure)
- Blocker/Diluent Part A
- Blocker/Diluent Part B
- plastic dish with cover
- rotary shaker
- blocking solution
- 5-MeC antibody
- TBS-T
- secondary antibody solution
- chromogenic substrate
Method:
DNA Dilutions:
- Borrow a DNA sample from another group (Andy's group, Concentration: 153.1 ng/uL, 260/280: 1.85)
- make initial dilution so it became 50ng/uL. (Added 198uL of DI water)
- Label 5 snap caps with initials(RD), DNA, and target concentration
- Prepare 5 dilutions for the DNA, one of each target concentration.
- Observe set-up dot blot vacuum manifold.
| Dilution |
TARGET amount |
ul of H20 |
ul of 20X SSC |
ul of 50ng/ul DNA sample |
| 1 |
800 ng |
124 |
60 |
16 |
| 2 |
400 ng |
132 |
60 |
8 |
| 3 |
200 ng |
136 |
60 |
4 |
| 4 |
100 ng |
138 |
60 |
2 |
| 5 |
50 ng |
139 |
60 |
1 |
- Cut nylon membrane to fit the manifold.
- Soak nylon membrane in 6X SSC for 10 minutes
- Cut filter paper to size nylon membrane and wet it in 6X SSC
- Assemble the manifold with the membrane lying on top of the filter paper
- Denature DNA in boiling water for 10 minutes. Then immediately transfer to ice.
- Switch on vacuum, and apply 500uL of 6X SSC to each well and allow SSC to filter through. Adjust the vacuum speed so it takes a couple of minutes for the SSC to filter through.
- Spin down DNA for 5 minutes.
- Apply entire DNA to wells (Do not touch the membrane)
- Note where you put your samples and each concentration on the blot map.
- Allow samples to filter through. (If sample is not filtering, carefully pipette without touching the membrane)
- While samples are being pulled through the nylon membrane, cut filter paper to size denaturation buffer.
- Once filtered through, dismantle manifold and transfer membrane (Dot side up) to filter paper soaked in denaturation buffer and let it sit for 5 minutes.
- Place membranes on dry filter paper and dry it.
- Wrap dyed blot in plastic wrap and place DNA-side-down on UV transluminator for 2 minutes at 120kJ. (This will immobilizes the DNA)
WesternBreeze Chromogenic Immunodetection:
1. Prepare 20ml of blocking solution:
- Ultra filtered water 14ml
- Blocker/Diluent (Part A) 4ml
- Blocker/Diluent (Part B) 2ml
3. Incubate for 30 minutes on a rotary shaker set at 1rev/sec
4. Decant the Blocking Solution
5. Rinse the membrane with 20ml of water for 5 minutes, then decant. (repeat again 1x)
6. Prepare 10ml of Primary Antibody Solution (1:5000 dilution)
- Blocking solution 10ml
- 5-MeC antibody 2ul
8. Decant primary antibody and wash the membrane for 5 minutes with 20ml of 1x-TBS-T. (Decant then repeat 3 times)
9. Incubate membrane in 10ml of secondary antibody solution for 30 minutes. Decant.
10. Wash the membrane for 5 minutes with 20ml of TBS-T. (Decant then repeat 3 times)
11. Rinse the membrane with 20ml of water for 2 minutes. (Decant then repeat twice)
12. Incubate the membrane in 5ml of Chromogenic Substrate until color begins to develop (1-60 mintues)
13. Rinse the membrane with 20ml of water for 2 minutes. (Decant then repeat twice)
14. Dry membrane of clean piece of filter paper.
Quantitative PCR:
Materials:
- PCR Plates (white); optically clear caps
- 1.5 ml microfuge tubes (RNAse free)
- Nuclease Free water
- filter tips
- Opticon thermal cycler
- kim wipes
- 2x Immomix Master Mix
- SYTO-13 Dye
- microfuge tube racks
- ice buckets
- timers
- cDNA samples (student provided)
Methods:
1. Prepare master mix (prepare for number of reactions +1 for error)
For a 25ul reaction volume:
| Component |
Volume |
Final Conc. |
| Master Mix, 2X (Immomix) |
12.5µL |
1x |
| Syto-13 dye (50uM) |
1µL |
2µM |
| upstream primer, 10μM |
1.25μl |
2.5μM |
| downstream primer, 10μM |
1.25μl |
2.5μM |
| Ultra Pure Water |
7uL |
NA |
3. Thaw cDNA samples.
4. Add 2uL of cDNA template to each reaction.
5. Add 2uL of ultra pure water to the negative control wells.
6. Cap the wells securely.
7. Spin the strips to pool the liquid on the bottom.
8. Ensure the lids are clean and place strips on ice.
9. Load the plate, verify the PCR conditions and start the run (Done by the TA).
PCR conditions:
1. 95°C for 10 minutes
2. 95°C for 15s
3. 55 °C for 15 s
4. 72°C for 30 s (+ plate read)
5. Return to step 2 39 more times
6. 95°C for 10s
7. Melt curve from 65°C to 95°C, at 0.5°C for 5s (+plate read)
Results:
Results for all experiment done by this date will be acquired in the next lab.
Conclusion:
We will know the result at the next lab. This lab is to practice qPCR, DNA extraction, and epigenetics.
Reflection:
the qPCR will be useful for my research experiment. I will do qPCR in the next lab.
Lab 8
Date:11/22/2011
Summary: Do PCR on the research sample
Materials and Method:
Similar to Quantitative PCR for lab 7
15 cDNA research samples
Results:
The results is stored by the TA. The final analyzed results will be in the research paper.
Conclusion:
The qPCR shows good results. Further analysis will be done for the research paper.
Reflection:
The qPCR produced good data for the research paper.
Lab 11/29/2011
Lab Questions:
1. The results for the nanodrop quantification shows high concentration and purity. It also shows that gene expression is present. In the qPCR, most of the samples shows IGF gene expression except for sample O5 where there is no gene expression. This can be caused by a pipetting error, or because the gene is not expressed at all in the sample O5. The second reason is also possible because it is expected that the samples which it is acclimated in the hyperoxic environment will have lower level of IGF gene expression. This proves that the oysters which are acclimated in the semi-hypoxic environment are better adapted to the actual hypoxic event.-
2. The high number of samples could result in some error while doing the lab work (-
3. This experiment can prove that an organism that has been acclimated to a stress can survive and adapt (-
4. The gene expression in sample O5. This is surprising because there are no detected IGF gene expression. There are 2 possible reason for this: pipetting error or no expression at all. This is a mystery and it is hard to get the real answer. -
5.-The HIF gene is one of the reason that the IGF gene is lower in the hyperoxic acclimated oysters. It is researched that HIF genes suppress IGF gene expression. This is proven by the paper researching about the cancer cell. -
-The study on how the IGF gene stimulates protein synthesis of the Pacific Oyster. The expression varies throughout the year which because of the insulin-like system. This proves that the IGF gene expression can increase or decrease depending on external factors.